spülbecken camping Spüle für Wohnmobil und Camper - 40x35cm
SKU: 40556688707
spülbecken camping

spülbecken camping Spüle für Wohnmobil und Camper - 40x35cm

Sale price$25.68 Regular price$28.53
Save 10%

Pay in installments of $7.13 with ShopPay, AfterPay and Klarna

Shipping Estimate
USA
  • USA
  • CAN

Ships within 48 hours · Estimated delivery Jul 6 - Jul 11

Promo Codes Available:

For Your Every Summer RSVP, with Code: SUMMER15

Description

spülbecken camping Spüle für Wohnmobil und Camper - 40x35cmEdelstahlsple 304 mit gehrtetem Glasdeckel Kche fr Wohnmobil und Camper Die kompakte Sple, die Ihre Arbeitsflche verwandelt. Robuster Edelstahl Qualitt 304, gehrteter Glasdeckel, der sich klappen lsst, um Arbeitsflche freizugeben, und integrierter Ablaufventil. Erhltlich allein (Pack 1) oder mit klappbarem Edelstahlwasserhahn (Pack 2), um jeden Zentimeter Ihres Mbelstcks optimal zu nutzen. Warum diese Sple whlen Lebensmittelechter Edelstahl 304

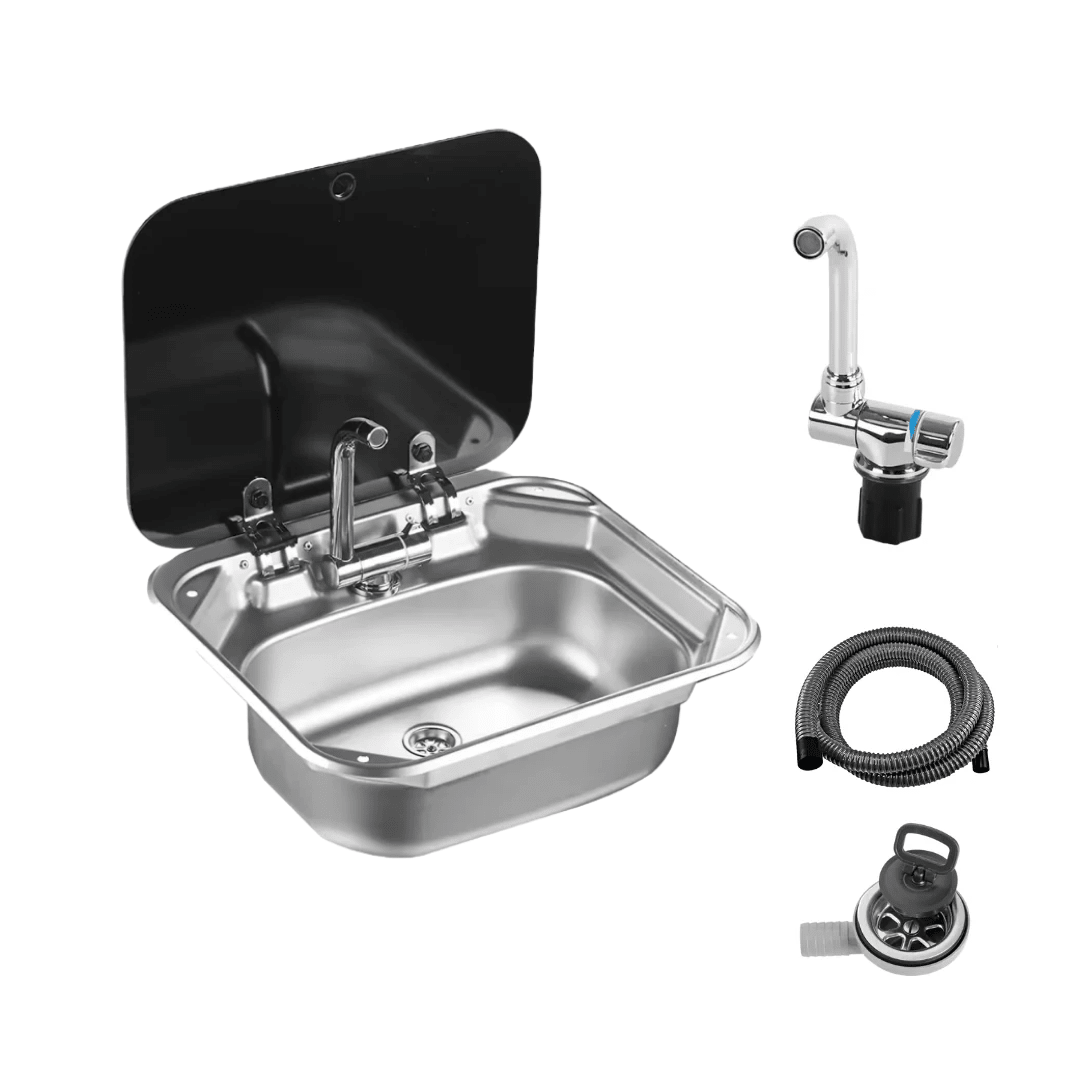
Edelstahlspüle 304 mit gehärtetem Glasdeckel — Küche für Wohnmobil und Camper

Die kompakte Spüle, die Ihre Arbeitsfläche verwandelt. Robuster Edelstahl Qualität 304, gehärteter Glasdeckel, der sich klappen lässt, um Arbeitsfläche freizugeben, und integrierter Ablaufventil. Erhältlich allein (Pack 1) oder mit klappbarem Edelstahlwasserhahn (Pack 2), um jeden Zentimeter Ihres Möbelstücks optimal zu nutzen.

Warum diese Spüle wählen

  • Lebensmittelechter Edelstahl 304 — korrosionsbeständig, ideal für Wasser und den täglichen Küchengebrauch.
  • Gehärteter Glasdeckel — schützt vor Lärm und Staub, schafft Arbeitsfläche, wenn die Spüle nicht benutzt wird.
  • Kompaktes Format — 42 × 37 cm Gesamtmaß, perfekt für Küchen in Campern und Wohnmobilen, wo jeder Zentimeter zählt.
  • Ablaufset inklusive — 25 mm Schlauch + Ablaufventil in allen Packs enthalten.
  • Ausschnittschablone enthalten — erleichtert die Installation in der Arbeitsplatte.
  • Standard 35 mm wasserhahnloch — kompatibel mit den meisten Küchenwasserhähnen für Camper/Wohnmobile.
  • Pack 2 mit klappbarem Edelstahlwasserhahn — klappt flach zusammen, um den Deckel zu schließen und die Küche während der Fahrt freizugeben.
  • 2 Jahre Garantie .

Technische Merkmale

  • Material: Edelstahl Qualität 304
  • Edelstahlstärke: 0,8 mm
  • Deckel: gehärtetes Glas
  • Gesamtmaße: 42 × 37 cm
  • Beckenbreite: 42 cm
  • Beckentiefe: 35 cm
  • Spülenhöhe: 14 cm
  • Bohrlochdurchmesser für wasserhahn: 35 mm
  • Ausschnittschablone inklusive
  • Garantie: 2 Jahre
  • 2 Jahre Garantie .

Inhalt der Packs

Pack 1 — Nur Spüle

  • Edelstahlspüle
  • Ablaufset (25 mm Schlauch + Ablaufventil)
  • Ausschnittschablone

Pack 2 — Spüle + klappbarer wasserhahn

  • Edelstahlspüle
  • Ablaufset (25 mm Schlauch + Ablaufventil)
  • Edelstahl klappbarer wasserhahn (klappt flach zusammen)
  • Anschlussschläuche
  • Ausschnittschablone

Der Vorteil des gehärteten Glasdeckels

In einem Camper oder Wohnmobil ist die Arbeitsfläche selten groß genug. Mit geschlossenem Deckel wird die Spüle zu einer Arbeitsflächenerweiterung: Sie schneiden Ihr Gemüse darüber, stellen die Kaffeemaschine ab, arbeiten, ohne alles wegräumen zu müssen. Mit geöffnetem Deckel haben Sie eine klassische Edelstahlschüssel zum Abwaschen oder Kochen.

Das gehärtete Glas ist stoßfest im Alltag, lässt sich mit einem Schwamm leicht reinigen und bietet eine hochwertige Optik im Vergleich zu einem Kunststoffdeckel.

Der klappbare wasserhahn (Pack 2)

Der Edelstahlwasserhahn des Pack 2 klappt flach auf sich selbst zusammen, was ermöglicht:

  • Den Glasdeckel schließen, ohne den wasserhahn zu demontieren oder zu umgehen
  • Die verfügbare Höhe unter den Oberschränken während der Fahrt freihalten
  • Stöße und Brüche vermeiden, wenn das Fahrzeug fährt

Wichtig zur Wasserversorgung: Dieser wasserhahn hat keinen integrierten elektrischen Schalter. Er funktioniert mit einer selbstansaugenden Pumpe vom Typ Wasserpumpe 12V Vanlife — die Pumpe erkennt den Druckabfall beim Öffnen des wasserhahns und schaltet sich automatisch ein, dann aus, wenn Sie den wasserhahn schließen.

Installation

Die Installation folgt dem klassischen Schema einer Einbauspüle: Zeichnen Sie den Ausschnitt mit der mitgelieferten Schablone, sägen Sie die Arbeitsplatte aus, setzen Sie die spüle mit Silikondichtung ein, befestigen Sie sie von unten, verbinden Sie den Siphon mit dem 25-mm-Abflussrohr zu Ihrem abwassertank und schließen Sie den wasserhahn (Pack 2) an die Druckpumpe und den frischwassertank an.

Es sind keine speziellen Werkzeuge erforderlich, außer einer Stichsäge und einem Schraubendreher.

Häufig gestellte Fragen

Welche Pumpe mit dem wasserhahn aus Pack 2 verwenden? Eine selbstansaugende Pumpe mit Druckschalter 12V — die Pumpe startet beim Öffnen des wasserhahns (Druckabfall) und stoppt beim Schließen.

Trägt die Glasabdeckung das Gewicht eines Topfes? Ja — gehärtetes Glas, das für diesen Zweck entwickelt wurde. Vermeiden Sie dennoch, heiße Gegenstände direkt ohne Untersetzer darauf zu stellen.

Edelstahl 304 vs 201? 304 ist lebensmittelechter Edelstahl, viel korrosionsbeständiger als 201, das oft bei Einsteiger-spülen verwendet wird. Es ist der Standard für Küche und Bad.

Mit welchem Möbeltyp kompatibel? Jeder zuschneidbare Arbeitsplatte (Holz, Sperrholz, Melamin, Laminat). Die mitgelieferte Schablone gibt Ihnen die genauen Maße.

Eine kompakte, funktionale und saubere Vanlife-Küche

Wenn Sie eine spüle möchten, die beim Kochen wenig Platz einnimmt und verschwindet, wenn Sie arbeiten, ist der GR-586 die direkteste Option. Wählen Sie das Pack 1, wenn Sie bereits Ihren wasserhahn haben, oder das Pack 2, um mit einem klappbaren Edelstahl-wasserhahn, der bereits für die Straße geeignet ist, zu starten.

Shipping Notes
  • Free Standard Shipping on $100+ Orders to the USA.
  • Except Preorder products are shipped in 48 hours.
  • Delivery to the USA:
  1. Standard Shipping : 3-10 business days
  • If time is of the essence, please consider selecting expedited delivery for faster service.
Exchange/Return Notes
  • We offer a 30-day return/exchange service after receiving.
  • Final sale items are not eligible for returns or exchanges.
  • To process your return/exchange, please contact us at [email protected]
  • Please click here for more details>>> Return & Exchange Policy
SKU: 40556688707

Discover Niche Categories That Outsell spülbecken camping

Top-Converting Item to Boost Your Average Order

4.4 ★★★★★
Based on 2016 reviews
Sort
Highest Rating
Newest First
Oldest First
Product Reviews
S
Verified Purchase
S
Draper, US
★★★★★ 5
Comparison with POTAUTO filter: Very similar but cheaper
I bought a POTAUTO MAP 1033C and EPAuto CP846 cabin air filter to compare them for use in my 09 Legacy (gen 4). They both seemed comparable and are cheaper than most other, similar filters, though the POTAUTO was and still is ~33% more expensive than the EPAuto. Both seem built well-enough, considering they're only being used as relatively low-flow cabin filters. That said, the EPAuto is slightly better, mainly due to the white trim piece being unattached along one side on the bottom of the POTAUTO filter. Almost certainly nothing that will affect its performance or longevity, but it is interesting considering it's the more expensive of the two. However, it must be kept in mind that this is an incredibly small sample size. In one of my very scientific tests (/s), I held them up side by side and looked through them toward the sun (obviously being careful) to judge thickness/density and uniformity. Neither had any thin spots that I noticed, and they were pretty similar overall. One of them blocked slightly more light than the other, indicating more filtration, but I unfortunately don't remember which one. I feel like it was the EPAuto, but I don't really want to speculate as I could very well be wrong. What I do remember is that the difference was so minor that all else being equal, it wouldn't justify the cost difference between the two. In other words, even if the POTAUTO were the slightly better one, it wouldn't be worth the extra few dollars for the minimal amount of extra filtration. In another test, I compared the filters to each other and the old filter (which I'm pretty sure was OEM, but certainly not a charcoal filter, so it was significantly thinner) by blowing air from a compressor through them. I held the nozzle at roughly the same distance from each on one side of the filters, and I held my other hand at roughly the same distance from each on the other side. The old filter, unsurprisingly, let much more air flow through. Both charcoal filters were much more restrictive due to their extra thickness, leading me to feel much less air coming through. Both were roughly the same. Both filters also held up just fine to the strong blasts of air. I bought a couple other filters that I was going to cut to fit to use one or both with these filters as a pre-filter and/or additional charcoal layer. After the airflow test, I decided against this, as these are a lot more restrictive than OEM already, and I didn't want to push it, since that could at best cause issues with getting good airflow into the car, and at worst could damage the blower. If not for the fact many, many people have been using these and similar filters for a long time without apparent issue caused by this, I would hesitate to even use these. I haven't noticed a decrease in the airflow, but it's doubtful I would since I rarely turn the fan up past the first couple settings (usually have it on the first) if I have it running at all, and I have the center vents pulled out (to access the inside of the dash) which causes the flow at the vents to be reduced slightly. TL;DR - Both the POTAUTO and EPAuto charcoal filters appear to be a good choice, with the EPAuto having a slight edge on build quality (based on my limited sample size of one each) and a cheaper price. Filtration appears to be very similar between the two, certainly not enough of a difference to warrant the extra price for the POTAUTO over the EPAuto. Flow is significantly more restrictive than OEM filter but doesn't appear to be an issue. I give the EPAuto 5 stars and the POTAUTO 4 stars, only because the value of the POTAUTO is a good bit less (very similar or possibly even inferior quality for 33% more money). I can't speak to their longevity or performance, but I don't imagine either should prove to be an issue. -------------------------------------------------- As a side note relating specifically to the Legacy: replacing the cabin filter in this car is a PITA. It's not overly difficult per se, but a serious pain and certainly not something you're going to do when you have a spare few minutes. I'd rate it probably around a 3.5/10 in difficulty and a 7/10 for annoyance. While you can sort of access it by removing the manual compartment, you can't remove the tray through that. So you need to actually take the whole glove box out, which requires removing the side panel, unhooking the string/loop that keeps it from falling all the way down, and removing a few plastic screws, which can be a bit of a pain (and apparently Subaru loves them since they're all over the car). A stubby Philips driver will be helpful. Once you have the glove box out of the way, you have to unscrew several more of those plastic screws to remove the plastic cover between the glove box and the filter. This hole is where you gain access. Be careful when removing the old filter as loose dirt and debris may fall out and make a bit of a mess. You don't really want to get any in the fan below it if you can help it. Reverse the steps to reassemble it, and remember to reattach the string. Getting the glove box back in its track can be a bit of a challenge; in my experience from doing it multiple times I've found you sort of half force it and half don't. That is, it'll likely offer some resistance even if it's lined up, so if you try to baby it you'll probably be there a while, but also play with the alignment a bit to see if you can get it without marring up the tab and the slot on the right side too much. All in all, expect to spend anywhere from 15-45 minutes on this, and make sure you have a standard length as well as a shorter or stubby Philips screwdriver. I have to say, when it comes to air filters, this car is horrible. The air intake filter is a pain to change, too--much worse than most if not all other cars I've done. -------------------------------------------------- Keywords: Subaru Legacy, fourth gen, fourth generation, 4th gen, 4th generation, 03, 04, 05, 06, 07, 08, 09, 2003, 2004, 2005, 2006, 2007, 2008, 2009
WAS THIS REVIEW HELPFUL?YesReportShare
Reviewed in the United States on September 29, 2017
R
Verified Purchase
R
Boise, US
★★★★★ 5
Good price on the part and 5 min install saved me $35
Fit fine in my 4th gen 4Runner took 5mins to install
WAS THIS REVIEW HELPFUL?YesReportShare
Reviewed in the United States on April 19, 2026
M
Verified Purchase
M. Clark
Charlottesville, US
★★★★★ 4
Fit 4runner
Fit my 05 4runner. Good product
WAS THIS REVIEW HELPFUL?YesReportShare
Reviewed in the United States on August 2, 2025
W
Verified Purchase
WTG
Lake Worth, US
★★★★★ 5
Great price!
I love that I can order these on Amazon for less than half of what I would pay at the mechanic. They fit perfect, and they're a pretty easy install.
WAS THIS REVIEW HELPFUL?YesReportShare
Reviewed in the United States on March 22, 2026
S
Verified Purchase
Sean
Birmingham, US
★★★★★ 5
Will buy again!
What a perfect replacement and they fit just right.
WAS THIS REVIEW HELPFUL?YesReportShare
Reviewed in the United States on March 12, 2026

recommand products