Shipping Estimate
USA
- USA
- CAN
- USA
- CAN
Ships within 48 hours · Estimated delivery Jul 14 - Jul 19
 Promo Codes Available:
For Your Every Summer RSVP, with Code: SUMMER15
Description
white spider lily scientific name White Spider Lily (Lycoris albiflora)Lycoris albiflora White Spider Lily We are offering these as plugs while supplies last! That means that we have started these, and they are ready to go into your garden especially now to take in nutrients because they have foliage. They will go dormant in another couple of months. So what are plugs? Lycoris plugs arent grown from seeds like most flowers. Instead, they come from tiny baby bulbs that were created using special plant science techniques.
Lycoris albiflora - White Spider Lily - We are offering these as plugs while supplies last! That means that we have started these, and they are ready to go into your garden especially now to take in nutrients because they have foliage. They will go dormant in another couple of months.
So what are plugs? Lycoris plugs aren’t grown from seeds like most flowers. Instead, they come from tiny baby bulbs that were created using special plant science techniques. Growers take a small piece of a healthy Lycoris bulb and encourage it to form new bulblets in a clean, carefully controlled environment. Once those baby bulbs develop roots, they’re grown in small plug trays — ready to be planted and grown into full-sized blooming bulbs.
So when you buy a Lycoris plug, you’re getting a young plant that started from a real Lycoris bulb, not a seed. It’s simply a smaller, earlier stage in the bulb’s life — just waiting to grow into those beautiful late-summer blooms. You will receive 12 plugs that already have the foliage up and growing so you know they are healthy.
So will they bloom in the fall of 2026?
It may take them a couple of years in the ground before they produce blooms. Like all Lycoris, when these bulbs bloom depends on how much sun and nutrients they absorb during the winter. To keep them happy:
-
Plant them in the ground for best results, spacing them close together.
-
Protect from freezes: If temperatures are expected to drop below 33°F, cover them with a bucket or frost cloth.
-
Healthy bulbs: You’ll know your plugs are strong because they arrive with their foliage already up — a sign they’re ready to grow!
With a little care, your Lycoris plugs will reward you with gorgeous late-summer blooms year after year.
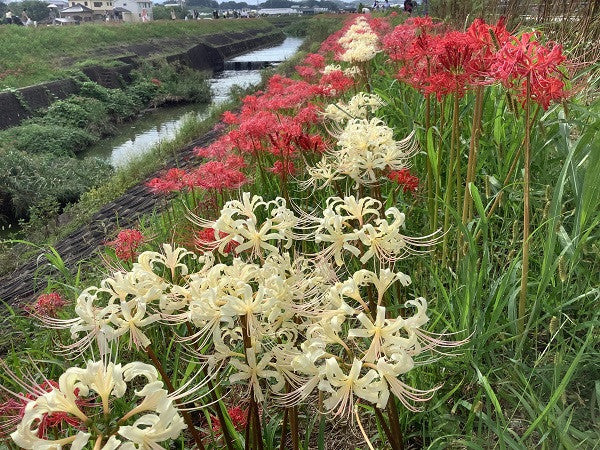
The white spider lilies (Lycoris albiflora) are often seen blooming at the same time and in the same regions as the red spider lily (Lycoris radiata). In fact, they look very similar to the red spider lily, except that they are white! I first collected mine from a garden in Natchez, Mississippi where they seem to thrive. This garden belonged to one of the founding members of the Southern Garden History Society, but I am not sure where they originally obtained their bulbs.
How they bloom: White spider lilies bloom just like the red spider lilies - completely different from most "regular" flowers. Now is a perfect time to plant white spider lilies. Spider lily bulbs often need 1-2 years in the ground before they bloom so you are giving the white spider lilies that full year in the ground before they should pop up with a bloom on a naked stalk next September. White spider lilies usually take 1-2 years planted before presenting foliage or blooms. Your bulbs are developing a strong root system right now to support future foliage and eventually blooms. You might see the foliage this November - April, but don't be concerned if you don't.
Most people still expect to see something growing during the summer months. You won't see anything. These lilies are dormant in the summer. The flowers suddenly appear with the first later summer and early fall rains. One day there is nothing growing and then suddenly you have a surprise, a fully blooming flower! That is why they are called "Surprise lilies". They surprise you when they bloom because you didn't see anything growing just days before. White Spider lilies act very similarly to red spider lilies, yellow spider lilies, schoolhouse lilies, and naked ladies. Simply put, they bloom in the fall and then have foliage for the winter. Mr. Wiesinger has red spider lilies planted for almost 2 years that have not yet produced blooms but have produced increasing foliage each year.
Foliage: Let's talk foliage for a moment. We know that we all want to see the beautiful unusual blooms in the fall, but the foliage is very important. The foliage is what allows the bulb to grow and multiply. Many people get very concerned if they don't see the spider lily bloom the first year that they plant it and believe that maybe the bulb isn't any good. The foliage is what you watch for if you don't see your spider lily bloom, or even if you do. Even if the foliage gets hit by a winter cold snap, it will have taken in nutrients for months! Always allow the foliage to die down naturally and don't cut it off. If you cut it, you are killing the bulb. Once the foliage is completely dead which is usually around May, this area can be mowed. Remember, it takes a lot of energy for the bulb to push that bloom up out of the ground and open wide. The more time the bulbs can take in nutrients, the more energy they will have for that fall bloom.
Blooms: They should bloom in September after being the ground for a year. However, depending on the rainfall, they may skip a year. Once established in your garden they are there for a lifetime! Some say that the flowers bloom two weeks after the first good fall rain. If there is no rain during the month of September, the bulbs have been known to not bloom at all. Individual blooms aren't softball-sized but blooms together on a stalk are softball-sized. The spider lily foliage follows the flower, staying green well through the winter and into late spring. We have spider lilies that haven't bloomed for two years due to no rain, but we know that they are healthy because the foliage appears every fall and is multiplying. Is there anything that you imagine wouldn't look even more amazing next to these blooms?
Sun Requirements: The single most important thing about landscaping with spider lilies is the sun. They need at least 1/2 day of WINTER sun. That means about 6-8 hours of sunlight during the winter months. If you look at the photo above, you will see that they are in the shade of the trees. You can be sure that most, if not all, of those trees, will lose their leaves in the winter when the greenery needs sunlight. The spider lily puts on its foliage during the winter (November - May) and that is when it takes in the nutrients it needs to produce those striking white flowers the following September. The winter foliage soaks up sun energy during winter as it prepares for summer dormancy. The foliage normally completely dies down by around May.
Plant: For the plugs, you will plant them even with the soil. The foliage is already up!
Don't plant the bulb too deep. You will plant the bulbs 2-3 times deep the height of the bulb (so if your bulb is 1" tall, then you will plant it 2-3 inches deep). You can plant 2-3 per hole to make the blooms look more natural. White spider lilies really do well in any type of soil, but you may want to amend heavy clay soil. They thrive in soil that has plenty of organic material mixed in, but they do not require fertilizer. Newly planted bulbs would actually be harmed by exposure to fertilizer, so if you are going to apply nutrients, limit the application to established plants when the plants are producing their green leafy foliage during the winter. After planting the bulbs, water the soil thoroughly. Damp soil is ok, as long as the bulbs are in a spot where they will receive plenty of winter sun and the foliage is allowed to die down naturally in the spring. Standing water is not good. Once the summer season starts the white spider lily will do best in soil that dries out a little, as this facilitates its entry into the dormant stage when its leaves die back. The white spider lily doesn't like to be completely dry during the summer though. This period is followed by its blooming season when it will reward daily watering with long-lasting blooms. Too much moisture in the soil will lead to the bulbs rotting.
Multiplying and Dividing: The white spider lily multiplies with new bulb offsets quite readily. The absolute best time to divide the spider lilies is at the beginning of April, when the foliage has absorbed winter and early spring nutrients from the sun and the foliage dies back (turns a yellow-brown). Is this practical though? A much more practical answer on when to dig, divide, and transplant spider lilies is a familiar answer: when you have time! Yes, you really should not dig them in late fall after they just started to put out roots and grow foliage, but you can if you need to (like if you are moving, or a road expansion project is going to wipe out an old house garden with generations of heirloom flower bulbs). No matter what time you transplant spider lilies, whether it's the spring or fall, they often skip a year of bloom after being disrupted.
Other perennials to use with white spider lilies: I prefer to use some of the best blooming, toughest perennials to mix into our garden. At my home if I don’t use the best perennials, we will either kill them because they are not watered while we’re out of town, the kids will walk over them or pick them when they are about to bloom, etc. etc. So, I prefer to use any one of the following:
1) Salvias: There are many Salvia species that exist. You could choose the large fall blooming Salvia leucantha, an heirloom selection like Salvia ‘Henry Duelberg’, or a modern selection like Salvia x ‘Big Blue.’
2) Lantanas: the old orange and white selection is great, but also try Lantana ‘Gem Compact Pink Opal’ or some of the trailing lavender or purple varieties.
3) Plumbago: comes in a beautiful blue or white, although the white seems to be a little harder to keep alive.
4) Phlox: one of the best summer phlox that takes over in the hottest part of July is the Phlox ‘John Fanick.’ I can think of few better ways to cover dormant spider lilies than with this amazing phlox.
Other Annuals to use with white spider lilies: There are many summer perennials (and annuals for that matter) that can cover your dormant spider lily bulbs while they rest under the ground, so I am going to focus on cool season or winter annuals. The idea with cool season annuals is to find a companion plant that brings color to your garden when the bulbs are not in bloom. Personally, I prefer perennials due to budget and time reasons, but I am not opposed to going all in with annuals some years or for special events (like when we hosted a wedding shower one fall):
1) Alyssum: ‘White Stream’ is a popular selection. It is a cool weather selection that would last in spite of our hot summers.
2) Snapdragons: play around with many of the colors new varieties offer! They are just annuals, so have fun experimenting with varieties such as ‘Snapshot Pink’ or ‘Speedy Sonnet Yellow.’
3) Pansies: I’ll throw Viola (Johnny Jump Up) into the mix as well. They pack a lot of color into a small space and can carry the garden from fall through spring if there aren’t any hard freezes. They come in yellows, pinks, blues, purples, and more. Matrix is a popular selection of pansy.
4) Cyclamen: the red and white of cyclamen can be stunning. They are very popular in Houston and other climates that don’t normally experience hard freezes.
5) Paperwhites: I’ve included paperwhites along with the other annuals, because although they can be used as perennials in certain circumstances, in this circumstance you will want to remove them after they bloom. The answer to adding flowers to hide foliage is not MORE foliage for months after they bloom.
Still more bulbs to use with white spider lilies: There are an assortment of other perennial flower bulbs that go well with spider lilies. These are bulbs that will bloom during other seasons. Other Narcissus which bloom from January to March, as well as bulbs such as white iris, snowflakes, and rain lilies which carry the bulbs from winter through early spring. Other rain lilies, crinums, and Hymenocallis can then carry the bulb section of your garden through summer, and generally pair well with the other perennials.
Are White Spider Lilies deer resistant?
While deer will eat anything (including plastic flowers if hungry enough), spider lilies are more resistant to their urges than many other ornamental garden products. They definitely leave the foliage alone. So the answer to this question, is that they are mostly resistant, depending on how hungry the deer are. Remember, humans ate tulips during times of hunger/famine, yet tulips definitely aren’t on our menu either.
Shipping Notes
- Free Standard Shipping on $100+ Orders to the USA.
- Except Preorder products are shipped in 48 hours.
- Delivery to the USA:
- Standard Shipping : 3-10 business days
- If time is of the essence, please consider selecting expedited delivery for faster service.
Exchange/Return Notes
- We offer a 30-day return/exchange service after receiving.
- Final sale items are not eligible for returns or exchanges.
- To process your return/exchange, please contact us at [email protected]
- Please click here for more details>>> Return & Exchange Policy