SKU: 68176045881
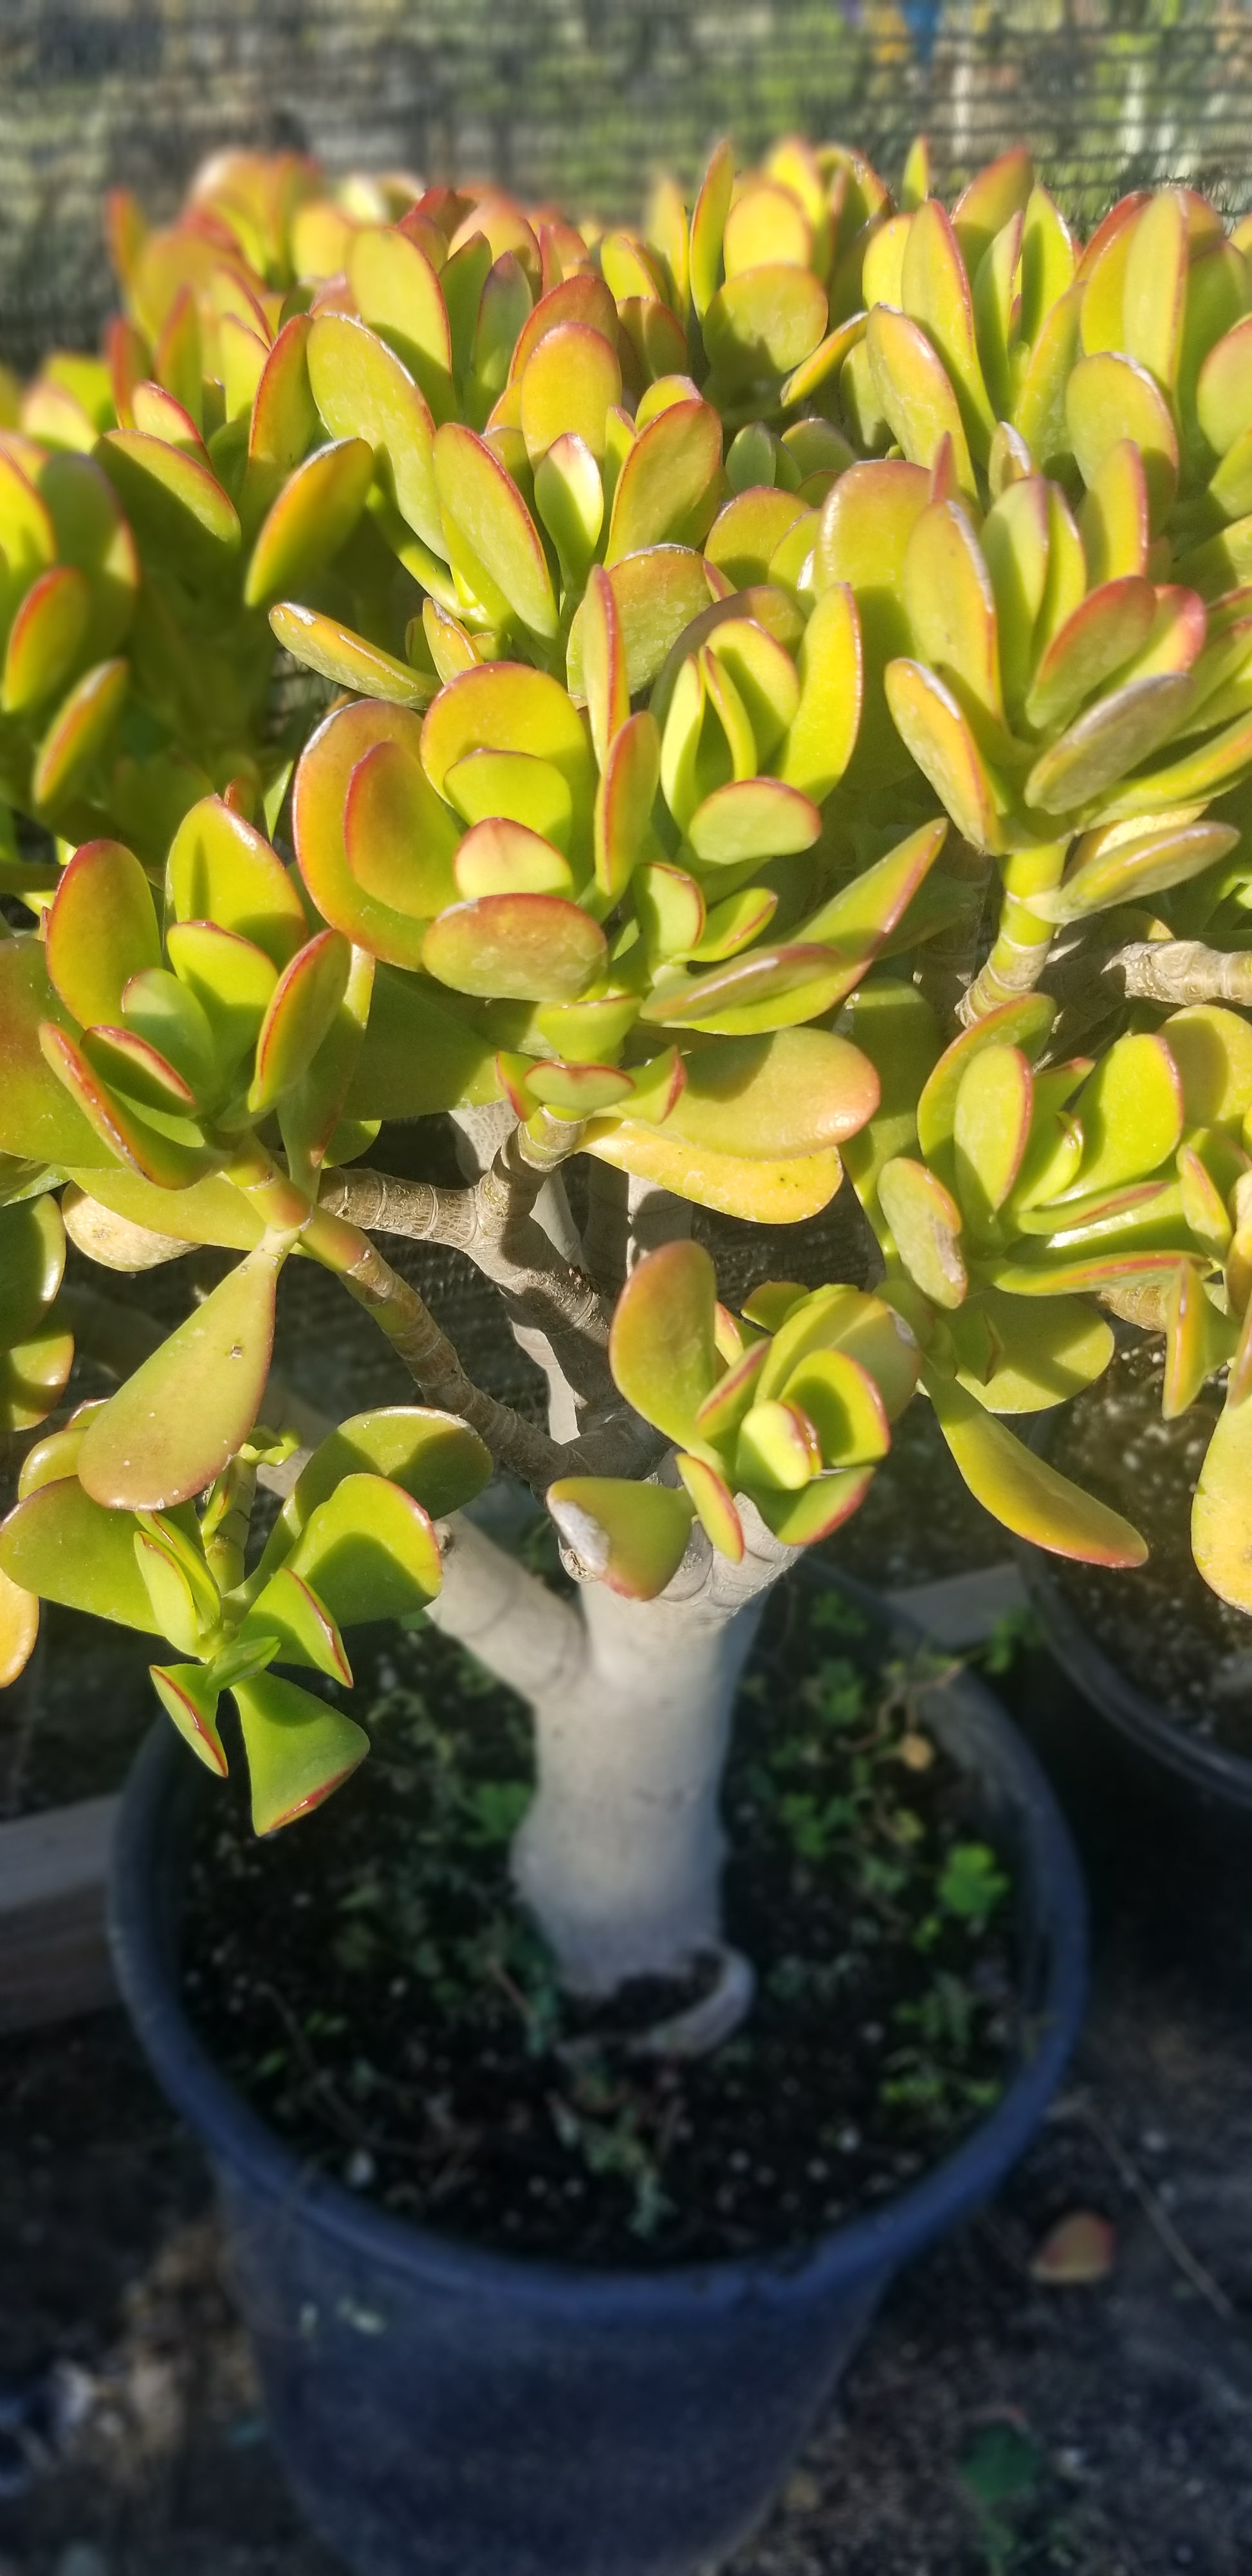
desert jade plant

desert jade plant Crassula Ovata Jade Tree – Beaultiful Desert Plants

Sale price$26.73 Regular price$29.70
Save 10%

Pay in installments of $7.42 with ShopPay, AfterPay and Klarna

Shipping Estimate
USA
  • USA
  • CAN

Ships within 48 hours · Estimated delivery Aug 3 - Aug 8

Promo Codes Available:

For Your Every Summer RSVP, with Code: SUMMER15

Description

desert jade plant Crassula Ovata Jade Tree – Beaultiful Desert PlantsCrassula Ovata Jade Tree *Trees are from 20" 25" Tall *Super Thick Trunk *Ship bareroot.. *We Only ship Priority so your Succulents plant will take between 2 to 3 days to arrive, we are not responsible for any USPS delays. * My Jades have really short roots, We reffed to the gallons that are planted in the add so you can see or estimate the actual size of the plant, do not expect to receive any Jade with long roots, That's why these trees are easy to

Crassula Ovata Jade Tree

*Trees are from 20" - 25" Tall *Super Thick Trunk *Ship bareroot.. *We Only ship Priority so your Succulents plant will take between 2 to 3 days to arrive, we are not responsible for any USPS delays. * My Jades have really short roots, We reffed to the gallons that are planted in the add so you can see or estimate the actual size of the plant, do not expect to receive any Jade with long roots, That's why these trees are easy to Trim and give a shape as a bonsai tree and plant them in a shallow pot. * We try to ship our succulent plants as soon as we get the order is customer responsibility to be aware of the plant arrival also customers will get a notification by email. If the customer wants to delay or change the day of the shipment please contact us as soon as possible. *We take great care in the packaging of your plants, but unfortunately the same cannot always be said in how they are handled once they leave us .*Is the customer responsibility to purchase a (Heat pack) if the Succulent plant is ship to a cold area, we usually recommended it if the whether is 35* or lower, If you are purchasing a large succulent plant please make sure you buy enough heat pack to cover the plant (1 heat pack every 12") We are not responsible for damages to the Succulent plant if is NOT enough coverage of the heat pack, and if is delay by USPS, the heat only will keep the box warm for 72 hours.

Crassula ovata, commonly known as jade plant, lucky plant, money plant or money tree, is a succulent plant with small pink or white flowers that is native to the KwaZulu-Natal and Eastern Cape provinces of South Africa, and Mozambique; it is common as a houseplant worldwide.[2] Much of its popularity stems from the low levels of care needed; the jade plant requires little water and can survive in most indoor conditions. It is sometimes referred to as the money tree; however, Pachira aquatica also has this nickname
Crassula ovata Jade Tree many people enjoy growing Jade Plants in their homes and offices, and they are considered to be symbols of good luck. But you do not need to be lucky to learn what the proper care and maintenance of Jade Plants is. The most important factors to consider when growing Jade Plants is water, light, temperature, and fertilizer. Growing Conditions Light: Jade Plant flourishes in good health with plenty of light. If you can provide a few hours of sunshine a day your going to have a happy plant. Soil: A good draining soil mix that is gritty is advisable to use, which is sold and used for cacti and succulents. Temperature: Room temperatures of around 60 to 75 °F (15.5 to 24 °C) are ideal. Winter no less than 50°F (10°C). Hardiness Zones: USDA plant hardiness zone 9b – 11a. Watering: It’s best to allow the soil to become dry between each watering which will depend on the time of year, how much humidity and amount of sunlight it’s getting. Allowing too much water to sit at the bottom of the pot with the roots will cause them to rot. Fertilizing: Feed each week or two (maybe less) with a weak or diluted liquid fertilizer. Fertilizer made for succulents may be your best bet, that does not need to be a high strength type.

As a succulent, Crassula ovata requires little water in the summer and even less in the winter. It is susceptible to overwatering, especially during the cold season. Watering excessively can cause leaf fall and root rot. On the other hand, a lack of water can also damage it. It should be grown in a porous substrate with good drainage, which will vary depending on the climate it is grown in. It requires about 4–6 hours of direct sun or medium shade exposures with bright light. In regions of mild weather it can withstand some light frost, provided that the substrate is kept dry.[6]

C. ovata may display a red tinge around its leaves when grown with bright sunlight. In more extreme cases, the green colour of the plant is lost and can be replaced by yellow. This is caused by the jade plant making pigments such as carotenoids to protect from harsh sunlight and ultraviolet rays. The plant also flowers in the wintertime, particularly during a cooler, darker, dry spell. C. ovata is sometimes attacked by mealybugs, a common nuisance of the succulents.

The jade plant is well known for its bonsai capabilities, since it forms a bonsai very easily when pruning is done correctly. Many who learn bonsai begin with a jade plant, since they are durable, easy to put through the bonsai process, and attractive.

Shipping Notes
  • Free Standard Shipping on $100+ Orders to the USA.
  • Except Preorder products are shipped in 48 hours.
  • Delivery to the USA:
  1. Standard Shipping : 3-10 business days
  • If time is of the essence, please consider selecting expedited delivery for faster service.
Exchange/Return Notes
  • We offer a 30-day return/exchange service after receiving.
  • Final sale items are not eligible for returns or exchanges.
  • To process your return/exchange, please contact us at [email protected]
  • Please click here for more details>>> Return & Exchange Policy
SKU: 68176045881

Discover Niche Categories That Outsell desert jade plant

Top-Converting Item to Boost Your Average Order

4.3 ★★★★★
Based on 5 reviews
Sort
Highest Rating
Newest First
Oldest First
Product Reviews
A
Verified Purchase
AB
Cuba, US
★★★★★ 5
High quality and robust
Size: 12 Pairs, Pattern Name: Banana Plugs
Easily the best plugs I've found at a reasonable price. Solid feeling with good quality and they look good with easy to see red/black labeling. The tips tend to unscrew too easily, but this is a non-issue when they are in use, just something you have to be careful not to lose when assembling. It's a bit tricky to spread the wire out evenly at the exact right length. If screwing the plug together is hard at all, go back and shorten how much wire you bend over the lip.
WAS THIS REVIEW HELPFUL?YesReportShare
Reviewed in the United States on June 16, 2025
W
Verified Purchase
William
Massapequa, US
★★★★★ 5
Solid banana clips
Size: 5 Pack, Pattern Name: Banana Plugs
Ah yes, I used these solid banana plugs to convert my wires. It’s pretty easy to set up once the wire housing has been stripped and really cleans things up nicely. I haven’t had any discernable hissing, noise problems, or connection issues.
WAS THIS REVIEW HELPFUL?YesReportShare
Reviewed in the United States on May 25, 2026
L
Verified Purchase
Leyland Cypress
Cuba, US
★★★★★ 3
Get the right wire guage
Size: 1 Count (Pack of 1), Pattern Name: Banana Plugs
I rate the banana plugs themselves 4 stars. They are everything I expected and work as advertised. It's the experience of assembly that I rate three stars. The way these work is -- you strip off the outer insullation of your wire and separate the two leads (positive and negative). Then you strip some length of insulation off the end of one of your leads, you unscrew the banana plug so that it separates into its respective base (lower) and contact (upper) halves, you slip the wire up through the base, you flare the copper strands of the wire and fold the individual strands over the very top of the base (about 1/16 of an inch) (taking care not to extend the strands over the threaded barrel of the base), then you screw the upper contact onto the lower base and voila, banana plug / wire assembly. It's not as complicated as it sounds. Go to the Monoprice website and watch their excellent instructional video. Here's the thing though. While the assembly is not complicated, it is tricky, and if you don't get your proportions right the first or second or third time, you'll have to do it over. Fist of all, if your wire guage is relatively thin, like my 16-guage speaker wire, you'll find that the entire wire, insullation and all, will slip right through the base of the plug without butting up against the bottom of the base. If this is the case, then the wire is left to sort of flop around inside the plug and that has a kind of unfinished, amateur look and feel to it, whereas if the wire butts up against the bottom of the base, it has a solid, one-piece professional look. So, to my mind, there's a sweet-spot for wire guage that works best with this plug -- not too thin and not too thick. And since Monoprice has debunked the thicker-is-better myth (the quality of the copper is the real determinant), then you should feel free to get the wire guage that fits the plug. Next -- and here's where it gets tricky -- once your copper extends beyond the top of the base, you'll need to limit this extension to about a sixteenth (no greatrer than a fourth) of an inch. Then you very delicately flare out the individual strands, in a 360- degree arc, and fold the strands over the top of the base. This takes a fair degree of manual dexterity, especially if the wire is "floating" inside the base and its travel is not stopped where the insullation meets the base. You'll have to hold the wire and base steady in the fingers of one hand, then flare out the wire strands with either your fingers or a suitable object (the working end of a ball-point pen worked for me) with the other hand. This one-sixteenth measure is important. If you extend wire strands beyond the top and over the threads of the base, you'll find that screwing the contact end onto the base is impossible and you'll need to start over. One or two strands is OK and almost unavoidable. In that case the screwing will catch but if you take a pair of pliers to it you can muscle through. By the way, you can avoid the whole mess by getting the open-screw type, which I'm sure will work just as well without any of the hassle of assembly. Like anything else, if you do it a few times to make the mistakes and learn the tricks, then it will become second nature, and if you've already done that, then my review might seem overly fussy. In that case feel free to leave comments to help other readers.
WAS THIS REVIEW HELPFUL?YesReportShare
Reviewed in the United States on October 15, 2012
J
Verified Purchase
JBDoge
New York, US
★★★★★ 5
Wish they came with instructions...
They are cheap and work great. They plug right into my Pioneer vsx521 receiver and my Paradigm Atom monitor speakers. I wish they came with instructions, because it took me about 10 minutes to realize the bottom part unscrews in addition to the top part. Here are my instructions for installation: 1) Unscrew the bottom part of this connector (the thin metal underneath the red/black ring). 2) Make sure the Banana Plug (which may be loosely screwed into the top part of the connector) is fully tightened down 3) Strip your wire tips to 3/8 of an inch (or just slightly under) 4) Run the first newly stripped wire end through the bottom part you removed in step 1, such that the stripped end of the wire is entering through the flat end and exiting through the smaller threaded end. 5) Leave about 1/8 to 3/16 of an inch of stripped wire hanging past the exit hole. 6) As evenly spaced as possible, bend the over-hanging wire strands over the exit hole (all around it, like a hat). If done properly, the wire should not fall out if you give it a VERY GENTLE tug. 7) Screw the top metal part (with the actual banana plug) back onto the bottom part. It may be difficult if your stripped wire is hanging too low. I've used a pair of pliers to grip the bottom part of the connector while I twist the banana plug side with my hand. If done correctly, you should be able to put a lot of tension between the wire and connector without removing/damaging it. UPDATE: I just recently helped my dad install his 5.1 system without these... it sucked... This item (5 pairs of them in this case) and a good wire stripper can save you alot of pain (both physical and mental). The connectors on the back of his receiver are the kind where bare wire comes in from the side and then the connectors screw down (with a banana plug hole in the center which is where this product would come into play). I felt like a surgeon trying to get a bare wire end into the little slot, and then holding it there while I tighten the connector which is almost impossible since they are so close together... GET THESE!
WAS THIS REVIEW HELPFUL?YesReportShare
Reviewed in the United States on February 8, 2012
R
Verified Purchase
R. Jackson
Draper, US
★★★★★ 1
'Monoprice' = Worst stereo banana plugs on T-H-E market.
Size: 5 Pack, Pattern Name: Banana Plugs
The absolute WORST in stereo banana plugs - HANDS DOWN. After installing stereos and components for over 30 years, I'd say I'm experienced. These banana plugs fail at EVERY part of the design. Allow me to explain... 1) Starting with the tips, they are loose off the bat and fit LOOSELY in either the stereo input studs or speaker input studs by their 'girth'. They do not firmly seat in any plug and for this setup, I'm using a nearly $2K setup all together. They 'rock' back and forth (when inserted) and thus create a non-permanent connection, again, seriously making these utter junk. I've seen some items you can get by with over the years, but these aren't even rock bottom. They are unusable! 2) Next, the banana plugs themselves comes as three pieces. No non loosening o-ring seal but a plastic colored want-to-be imitation for positive and negative notation. Why do these stupid things come in three pieces? - I simply can't tell you why. I do know they serve no specific piece to solving the puzzle of installation so why do they come in three pieces...? My speculation is they are cheap china knockoffs. 3) The 'way' in which you normally install the trimmed wiring internally with the 'two-piece' design permits you to firmly CRIMP and hold the unsheathed wiring; but these do not. The overlap/overlay of the exposed wiring can only be about 2/16's of an inch thus not much to create a proper connection with. This single fact eliminates these plugs as even worthwhile component add ons; period. If you can't achieve a good ground/wiring connection, these are a defeated purpose... 4) Because of the design of these, they have no room to crimp and screw on the cable so your forced to nearly break your fingers in an attempt to get the unsheathed wire to overlay the internal threading and twist them on with all your might. This in effect breaks nearly every wire thread internally and then they breaks off inside. Absolute garbage. These are total pieces of non-quality junk that did nothing but makes me waste 30 minutes on attempting to get them securely on and another 25 to locate my Amazon account, find this product in my order and ALARM anyone else from making the same mistake I made. Now, I find out I can't even get a return on these. Thanks Amazon. Thank you third party retailer. You just made me a very dissatisfied decade long customer.
WAS THIS REVIEW HELPFUL?YesReportShare
Reviewed in the United States on August 17, 2016

recommand products