Shipping Estimate
USA
- USA
- CAN
- USA
- CAN
Ships within 48 hours · Estimated delivery Jul 12 - Jul 17
 Promo Codes Available:
For Your Every Summer RSVP, with Code: SUMMER15
Description
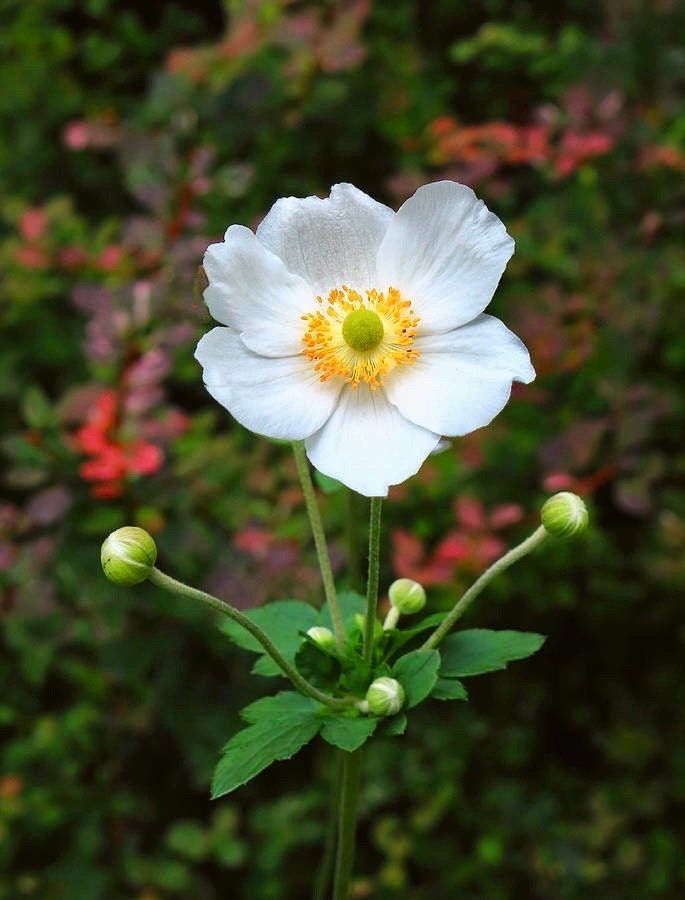
japanese flower seeds White Japanese Anemone Seeds ~ Anemone Hupehensis ~ Thimbleflower ~ Wildflowers ~ Heirloom ~ Bouquet ~ Fresh Cut Flowers ~ WeddingWindflower is another common name for Japanese Anemones and speaks to the delicate flowers that float and dance in the breeze on tall, slender stems. The flowers are two to three inches in size and come in single, semi double and double forms. Colors range from pure white to pink, lavender and purple. ~ Includes ~ ~ 5 Seeds. ~ Grow and Care Instructions. * Lots more of Colors Available and Marianne Panda Japanese Anemones, as shown in last photos.
Windflower is another common name for Japanese Anemones and speaks to the delicate flowers that float and dance in the breeze on tall, slender stems. The flowers are two to three inches in size and come in single, semi-double and double forms. Colors range from pure white to pink, lavender and purple.
~ Includes ~
~ 5 Seeds.
~ Grow and Care Instructions.
* Lots more of Colors Available and Marianne Panda Japanese Anemones, as shown in last photos.
✨ Follow Me ✨
Instagram: YourPlantBitch
Facebook: Your Plant Biitch
💕 Please come explore my site, YourPlantBitch, explore all of my new and exclusive collections. Rest assured, my main concern is my customers always!!! I try to provide the best customer service and strive to create a positive shopping experience for my customers. I’m always available to answer any questions or concerns you may have before and after your purchase. Custom orders are welcome!!! I can even include a handwritten gift card for no additional cost. Feel free to send me an offer, I will always do my absolute best to work with my customer’s offers. Contact me with any questions or if you’re interested in my sold~out items or need different quantities.
Thank you so very much for supporting my small business!!! 🪴Happy Planting🪴
💚 Best Wishes, Your Plant Bitch (Quinn)
🩷Anemone and Ranculus Bulb Grow and Care Instruction🩷
A few weeks before you're ready to plant, soak your corms in water for about eight hours to hydrate them. If you have an aquarium bubbler that can oxygenate the water, definitely use it! Keeping that water oxygenated will help prevent rot in the corms.
After soaking, we use drenches to help prevent rot later on. These drenches are like probiotics for plants. They contain good bacteria and fungi that will fight off bad bacteria and fungi. The products we use are called Actinovate and RootShield. The small packages of these products have been largely discontinued, but you might be able to find some. Just be sure to check the expiration date before you buy since they expire quickly.
Once your corms are hydrated, you can choose what to do next! For home gardeners, I think you're better off planting at this stage. However, we presprout our corms to ensure viability and protect them from rot at the early stage. You can definitely try this!
We add a layer of sterile, damp potting soil (just an inch or two) to a plant tray or crate. A box or Tupperware bin would also work. It's important that the soil is just barely damp. If you squeeze it and water comes out, it's too wet.
We lay the hydrated corms on the soil pointy side down. Then, we layer another layer of lightly damp potting soil on top. Just an inch or two.
Tuck the box into a cool, dark place for about two weeks. 50 degrees air temperature is ideal. An unheated garage or basement is perfect. Just make sure it's not too cold (a fridge) or too hot (a warm room). We've sprouted anemones and ranunculus in a drafty foyer, and it's worked just fine.
Keep an eye the soil. You don't want it to dry completely. Misting with water every couple of days could be a good idea. We like to mist with a backpack sprayer.
You'll know they're ready when little white roots emerge. Keep an eye out for rot, which looks like white marshmallow goo at this stage. If you see rot, your conditions were too wet, and the corms have spoiled.
Ranuculus likes mild, cool weather – depending on where you are, you can create the ideal environment for your corms by starting them in the fall or wait until later in the winter/early spring.
You should have success sprouting ranunculus in temperatures between 38°F ~ 50°F. The warmer the temperature, the faster they will sprout and the more green growth you may get. Monitor them carefully during this process to ensure corms aren’t too wet or too warm, as both can contribute to rot. If you are starting them in January to transplant out, you may need help from some additional heat whether it's heat mat or bringing them inside your house to sprout them, depending on your zone. You want mainly root growth and not a ton of green growth before they get transplanted into an unheated house, so watch them carefully in the sprouting process.
Plant in a well-draining soil and at least 6 hours of sun per day. If standing water pools up near this spot, choose a different one. Good drainage is imperative for growing anemones and ranunculus.
Soil should be loose and amended with an all-purpose fertilizer and aged compost. Don't use fresh manure or anything that could be "hot" with too much nitrogen or herbicides. (If you get horse manure from a farm that sprays glysophate on its weeds, the manure could contain glysophate.)
I grow ranunculus and anemones in zone 7b, so I have mild conditions for most of the winter. I begin planting anemones and ranunculus in November, and I continue until early March. Remember, anemones and ranunculus like cool soil -- no hotter than 60 degrees. If you plant too late and the soil gets hot while they're growing, they won't bloom. A soil thermometer is a good investment.
If you don't want to plant in fall -- because you'll have to protect your anemones and ranunculus during cold snaps -- save your corms in a cool, dark place until you're ready.
Once you've prepared your corms, you're ready to plant! Bury them in your chosen spot about an inch or two below the surface of the soil. When I say an inch, I mean that the top of the corm should have at least an inch of soil on top of it to protect it. Your hole is probably going to be 2 or 3 inches deep to accomplish this depth, depending on the size of the corm.
Lightly press the top of the soil to keep it from blowing off.
While They're Growing
Anemones like a drink once the air temperature is in the 50s and 60s. During the depths of winter, when it's colder, they don't need much water. Allow them to dry out between waterings to prevent rot.
When it comes to cold, remember that plants don't super know the difference between 38 degrees and 52 degrees -- they're good anywhere in that range. However, they DEFINITELY know the difference between 38 degrees and 31 degrees. When water transforms from liquid to solid, it can be traumatic for plant tissues. Anemones are very hearty, and they can tolerate temperatures in the high 20s with no issue. Ranunculus are more delicate, but a light freeze won't distress them.
However, once temperatures drop into the mid-to-low 20s, you want to think about protection. Agribon fabric is our favorite helper. However, if you use fabric or plastic to protect your plants, make sure you use stakes or wire hoops to prevent if from touching the leaves.
Troubleshooting
If you see black or brown growth on the leaves, you can pick them off. White mold is also a really bad sign. Preventing your anemones and ranunculus from sitting in wet soil is going to be the best way to prevent disease.
Your plants are likely to get a little spotty at some point, particularly if you live in a humid place like we do. Increase air flow by preventing weeds and decrease water. We don't really intervene beyond that. Don't freak out. They'll probably be fine. Or they'll die. That's farming.
Blooms
Anemones and ranunculus bloom spectacularly. It's great to leave them in your garden to enjoy. They last a long time on the plants.
If you want to harvest the blooms, wait until the anemones have opened and closed one time, and then cut them at the base.
For ranunculus, allow the petals to soften and fluff out just a little bit, like a marshmallow. You don't want to cut them when they're super tight; however, don't wait until the petals begin to unfold fully.
If you're not sure about the right stage of harvest, try some different options and monitor the results. See what works best for you!
✨ Follow Me ✨
Instagram: YourPlantBitch
Facebook: Your Plant Biitch
Please visit me @YourPlantBitch come explore all of my collections!!! Where you’ll be the first to see all my new products, along with YourPlantBitch’s best sellers and exclusive collections. Rest assured, my main concern is for my customers ALWAYS!!! I try to provide the best customer service and strive to create ONLY a positive shopping experience for my customers. I am available to answer any questions or concerns you may have before or/and after your purchase. Custom orders are welcome!!! If you would like me to include a handwritten gift card I can with never any additional cost. If you’re interested placing a bulk order, purchasing any “sold~out” and/or more than the quantities listed as “available” items please reach out to me!!!
Thank you so very much for supporting my small business!!! 🪴Happy Planting🪴
💚 Best Wishes, Your Plant Bitch (Quinn)
🩷Anemone and Ranculus Bulb Grow and Care Instruction🩷
A few weeks before you're ready to plant, soak your corms in water for about eight hours to hydrate them. If you have an aquarium bubbler that can oxygenate the water, definitely use it! Keeping that water oxygenated will help prevent rot in the corms.
After soaking, we use drenches to help prevent rot later on. These drenches are like probiotics for plants. They contain good bacteria and fungi that will fight off bad bacteria and fungi. The products we use are called Actinovate and RootShield. The small packages of these products have been largely discontinued, but you might be able to find some. Just be sure to check the expiration date before you buy since they expire quickly.
Once your corms are hydrated, you can choose what to do next! For home gardeners, I think you're better off planting at this stage. However, we presprout our corms to ensure viability and protect them from rot at the early stage. You can definitely try this!
We add a layer of sterile, damp potting soil (just an inch or two) to a plant tray or crate. A box or Tupperware bin would also work. It's important that the soil is just barely damp. If you squeeze it and water comes out, it's too wet.
We lay the hydrated corms on the soil pointy side down. Then, we layer another layer of lightly damp potting soil on top. Just an inch or two.
Tuck the box into a cool, dark place for about two weeks. 50 degrees air temperature is ideal. An unheated garage or basement is perfect. Just make sure it's not too cold (a fridge) or too hot (a warm room). We've sprouted anemones and ranunculus in a drafty foyer, and it's worked just fine.
Keep an eye the soil. You don't want it to dry completely. Misting with water every couple of days could be a good idea. We like to mist with a backpack sprayer.
You'll know they're ready when little white roots emerge. Keep an eye out for rot, which looks like white marshmallow goo at this stage. If you see rot, your conditions were too wet, and the corms have spoiled.
Ranuculus likes mild, cool weather – depending on where you are, you can create the ideal environment for your corms by starting them in the fall or wait until later in the winter/early spring.
You should have success sprouting ranunculus in temperatures between 38°F ~ 50°F. The warmer the temperature, the faster they will sprout and the more green growth you may get. Monitor them carefully during this process to ensure corms aren’t too wet or too warm, as both can contribute to rot. If you are starting them in January to transplant out, you may need help from some additional heat whether it's heat mat or bringing them inside your house to sprout them, depending on your zone. You want mainly root growth and not a ton of green growth before they get transplanted into an unheated house, so watch them carefully in the sprouting process.
Plant in a well-draining soil and at least 6 hours of sun per day. If standing water pools up near this spot, choose a different one. Good drainage is imperative for growing anemones and ranunculus.
Soil should be loose and amended with an all-purpose fertilizer and aged compost. Don't use fresh manure or anything that could be "hot" with too much nitrogen or herbicides. (If you get horse manure from a farm that sprays glysophate on its weeds, the manure could contain glysophate.)
I grow ranunculus and anemones in zone 7b, so I have mild conditions for most of the winter. I begin planting anemones and ranunculus in November, and I continue until early March. Remember, anemones and ranunculus like cool soil -- no hotter than 60 degrees. If you plant too late and the soil gets hot while they're growing, they won't bloom. A soil thermometer is a good investment.
If you don't want to plant in fall -- because you'll have to protect your anemones and ranunculus during cold snaps -- save your corms in a cool, dark place until you're ready.
Once you've prepared your corms, you're ready to plant! Bury them in your chosen spot about an inch or two below the surface of the soil. When I say an inch, I mean that the top of the corm should have at least an inch of soil on top of it to protect it. Your hole is probably going to be 2 or 3 inches deep to accomplish this depth, depending on the size of the corm.
Lightly press the top of the soil to keep it from blowing off.
While They're Growing
Anemones like a drink once the air temperature is in the 50s and 60s. During the depths of winter, when it's colder, they don't need much water. Allow them to dry out between waterings to prevent rot.
When it comes to cold, remember that plants don't super know the difference between 38 degrees and 52 degrees -- they're good anywhere in that range. However, they DEFINITELY know the difference between 38 degrees and 31 degrees. When water transforms from liquid to solid, it can be traumatic for plant tissues. Anemones are very hearty, and they can tolerate temperatures in the high 20s with no issue. Ranunculus are more delicate, but a light freeze won't distress them.
However, once temperatures drop into the mid-to-low 20s, you want to think about protection. Agribon fabric is our favorite helper. However, if you use fabric or plastic to protect your plants, make sure you use stakes or wire hoops to prevent if from touching the leaves.
Troubleshooting
If you see black or brown growth on the leaves, you can pick them off. White mold is also a really bad sign. Preventing your anemones and ranunculus from sitting in wet soil is going to be the best way to prevent disease.
Your plants are likely to get a little spotty at some point, particularly if you live in a humid place like we do. Increase air flow by preventing weeds and decrease water. We don't really intervene beyond that. Don't freak out. They'll probably be fine. Or they'll die. That's farming.
Blooms
Anemones and ranunculus bloom spectacularly. It's great to leave them in your garden to enjoy. They last a long time on the plants.
If you want to harvest the blooms, wait until the anemones have opened and closed one time, and then cut them at the base.
For ranunculus, allow the petals to soften and fluff out just a little bit, like a marshmallow. You don't want to cut them when they're super tight; however, don't wait until the petals begin to unfold fully.
If you're not sure about the right stage of harvest, try some different options and monitor the results. See what works best for you!
✨ Follow Me ✨
Instagram: YourPlantBitch
Facebook: Your Plant Biitch
Please visit me @YourPlantBitch come explore all of my collections!!! Where you’ll be the first to see all my new products, along with YourPlantBitch’s best sellers and exclusive collections. Rest assured, my main concern is for my customers ALWAYS!!! I try to provide the best customer service and strive to create ONLY a positive shopping experience for my customers. I am available to answer any questions or concerns you may have before or/and after your purchase. Custom orders are welcome!!! If you would like me to include a handwritten gift card I can with never any additional cost. If you’re interested placing a bulk order, purchasing any “sold~out” and/or more than the quantities listed as “available” items please reach out to me!!!
Thank you so very much for supporting my small business!!! 🪴Happy Planting🪴
💚 Best Wishes, Your Plant Bitch (Quinn)
Shipping Notes
- Free Standard Shipping on $100+ Orders to the USA.
- Except Preorder products are shipped in 48 hours.
- Delivery to the USA:
- Standard Shipping : 3-10 business days
- If time is of the essence, please consider selecting expedited delivery for faster service.
Exchange/Return Notes
- We offer a 30-day return/exchange service after receiving.
- Final sale items are not eligible for returns or exchanges.
- To process your return/exchange, please contact us at [email protected]
- Please click here for more details>>> Return & Exchange Policy