Shipping Estimate
USA
- USA
- CAN
- USA
- CAN
Ships within 48 hours · Estimated delivery Jul 10 - Jul 15
 Promo Codes Available:
For Your Every Summer RSVP, with Code: SUMMER15
Description
anderson philodendron Philodendron Red Anderson Variegata – Foliage FactoryPhilodendron 'Red Anderson' Variegata Philodendron 'Red Anderson' Variegata is a variegated climbing Philodendron with red toned new growth, burgundy stems, and glossy leaves marked in green, cream, white, and red pink. New leaves can show different mixes of marbling, streaks, pale sectors, and green tissue. Young foliage often carries the warmest tones before hardening into deeper green with cream white variegation. The stems and petioles keep a
Philodendron 'Red Anderson' Variegata
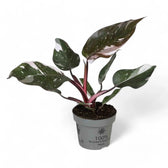
Philodendron 'Red Anderson' Variegata is a variegated climbing Philodendron with red-toned new growth, burgundy stems, and glossy leaves marked in green, cream, white, and red-pink. New leaves can show different mixes of marbling, streaks, pale sectors, and green tissue.
Young foliage often carries the warmest tones before hardening into deeper green with cream-white variegation. The stems and petioles keep a darker red tone between new leaves. As the stem lengthens, a pole, plank, hardwood stake, or coco support gives aerial roots a surface for attachment.
Red stems and variegated climbing growth
- Growth habit: Climbing Philodendron with a visible stem, nodes, aerial roots, and trainable upward growth.
- Leaf colour: New foliage can open red-pink before maturing into green, cream, white, and softer pink tones.
- Variegation: Patterns vary naturally from leaf to leaf, with marbling, splashes, streaks, and occasional broader pale sections.
- Stem colour: Burgundy-red stems and petioles keep warm colour visible below the foliage.
- Indoor habit: Grows as a supported indoor climber, with the lengthening stem producing nodes and aerial roots as it develops.
Climbing stem, nodes and variegated growth
Each node can hold a leaf, an aerial root, and a future growth point. Keep nodes firm and exposed when tying the plant in place, and use stem sections with viable nodes for propagation.
Variegation can shift between leaves as the plant grows. Some leaves may show stronger pale areas, others may carry more green, and new growth can open with red-pink tones that soften as the blade matures. Fully green growth can be pruned back to a healthy variegated node if the plant starts losing its patterned character.
As the plant develops, wider leaf spacing or smaller new blades can point to low light, root stress, or irregular watering. Pale leaf sections are more sensitive to harsh sun, so bright indirect light is safer than direct midday exposure.
Growing Philodendron 'Red Anderson' Variegata indoors
- Light: Give bright indirect light. Soft morning or late-day sun can be tolerated after acclimation, but strong midday sun can scorch pale variegated sections.
- Watering: Water thoroughly once the upper 30–50% of the substrate has dried. Let excess water drain away so the lower root zone does not stay stagnant.
- Substrate: Use a chunky aroid mix with bark, coco chips or coco coir, perlite, pumice, and a small amount of moisture-retentive material. The mix should hold some moisture while keeping air around the roots.
- Drainage: Keep the plant in a pot with drainage holes. A dense or collapsed mix can hold too much water around the base of the stem and increase root stress.
- Humidity: Around 50–70% helps new leaves expand smoothly, especially while variegated blades are unfurling.
- Temperature: Keep it warm indoors, ideally around 18–28°C. Avoid cold, wet substrate and prolonged temperatures below 15°C.
- Support: Add a pole, plank, stake, or other firm support while the stem is still easy to position. Tie the stem loosely at the nodes and keep pressure away from the petioles.
- Feeding: Feed lightly during active growth with a balanced houseplant or aroid fertiliser. Reduce feeding when light levels drop and growth slows.
- Repotting: Repot when the root ball is full, the plant dries much faster than before, or the support no longer feels stable in the pot. Choose a pot only one size larger to keep moisture easier to manage.
- Pruning: Trim damaged leaves close to the stem and cut fully green or overextended growth above a healthy variegated node.
- Semi-hydroponics: Can adapt to airy mineral substrates if roots are cleaned carefully, moisture stays even, and the stem base is kept above the wet zone.
- Propagation: Use stem cuttings with at least one healthy node. For patterned plants, choose a cutting with visible variegation on or near the node.
Leaf, stem and root troubleshooting
- Yellow lower leaves: Check whether the substrate is staying wet for too long. Let more of the pot dry before watering again and inspect the roots if yellowing spreads.
- Soft stem base: Often points to cold, wet conditions around the lower stem. Check the root ball, remove damaged tissue, and restart healthy node cuttings if the base is failing.
- Brown marks on pale areas: Cream-white sections can scorch faster than green tissue. Move the plant away from direct sun and check that roots are not drying unevenly.
- Long gaps between leaves: Usually linked to low light, weak root activity, or delayed support. Move the plant into brighter indirect light and secure the stem before it leans heavily.
- Small new leaves: Check for tired substrate, a cramped root ball, irregular watering, or reduced warmth.
- Loss of variegation: Fully green growth can continue producing greener leaves. Cut back to a healthy variegated node if the plant keeps pushing plain green growth.
- Leaf stuck in the cataphyll: Dry air, root stress, or inconsistent watering can interrupt expansion. Stabilise the moisture rhythm and raise ambient humidity if the problem repeats.
- Pests: Inspect leaf undersides, petioles, and new growth for thrips, mites, scale, and mealybugs, especially if leaves mark, distort, or emerge smaller than expected.
How the colours change with maturity
The strongest red and pink tones usually appear on new leaves. As each blade hardens, the warmer colour can soften while green, cream, and white variegation becomes clearer. Petioles and stems keep the redder tone for longer, so the red stem colour remains visible as older leaves mature.
Avoid bending mature stem sections sharply when tying them to support, and place ties around the stem while leaving individual petioles free. If the plant becomes top-heavy, adjust the support and pot stability before the stem twists or pulls against the root ball.
Pet and child safety
Keep Philodendron 'Red Anderson' Variegata away from pets and children. Its tissue contains insoluble calcium oxalate crystals, which can irritate the mouth, lips, tongue, throat, skin, and digestive tract if chewed, ingested, or handled by sensitive skin. Wear gloves when pruning if you react to aroid sap, and wash hands after taking cuttings.
Philodendron genus and name background
Philodendron belongs to the Araceae family and includes evergreen aroids with climbing, creeping, rhizomatous, tree-like, or rosette-forming growth depending on the species. The genus name comes from Greek roots often translated as “tree-loving”, reflecting the way many Philodendron grow with or against trees in tropical habitats.
Philodendron 'Red Anderson' Variegata has burgundy stems, red-pink emerging leaves, and glossy variegated blades that mature with green, cream, and white patterning.
Its colour changes are most visible in active new growth, while the climbing stem gives the plant a clear upward structure as it matures.
Shipping Notes
- Free Standard Shipping on $100+ Orders to the USA.
- Except Preorder products are shipped in 48 hours.
- Delivery to the USA:
- Standard Shipping : 3-10 business days
- If time is of the essence, please consider selecting expedited delivery for faster service.
Exchange/Return Notes
- We offer a 30-day return/exchange service after receiving.
- Final sale items are not eligible for returns or exchanges.
- To process your return/exchange, please contact us at [email protected]
- Please click here for more details>>> Return & Exchange Policy